 Controlling Access to Your Network
Dell™ OpenManage™ Version 5.2 Installation and Security User's Guide
Controlling Access to Your Network
Extending the Active Directory Schema
If you use Active Directory service software, you can configure it to control access to your network. Dell has modified the Active Directory database to support remote management authentication and authorization. Dell OpenManage™ IT Assistant and Dell OpenManage Server Administrator, as well as Dell™ remote access controllers, can now interface with Active Directory. With this tool, you can add and control users and privileges from one central database.

|
NOTE: Using Active Directory to recognize Dell Remote Access Controller (DRAC), IT Assistant, or Server Administrator users is supported on the Microsoft Windows® 2000 and Windows Server® 2003 operating systems. |
The Active Directory data exists in a distributed database of Attributes and Classes. An example of a Active Directory Class is the User class. Some example Attributes of the user class might be the user's first name, last name, phone number, and so on. Every Attribute or Class that is added to an existing Active Directory schema must be defined with a unique ID. To maintain unique IDs throughout the industry, Microsoft maintains a database of Active Directory Object Identifiers (OIDs).
The Active Directory schema defines the rules for what data can be included in the database. To extend the schema in Active Directory, Dell received unique OIDs, unique name extensions, and unique linked attribute IDs for the new attributes and classes in the directory service.
Dell extension is: dell
Dell base OID is: 1.2.840.113556.1.8000.1280
Dell LinkID range is: 12070 to 12079
The Active Directory OID database maintained by Microsoft can be viewed at msdn.microsoft.com/certification/ADAcctInfo.asp by entering our extension, dell.
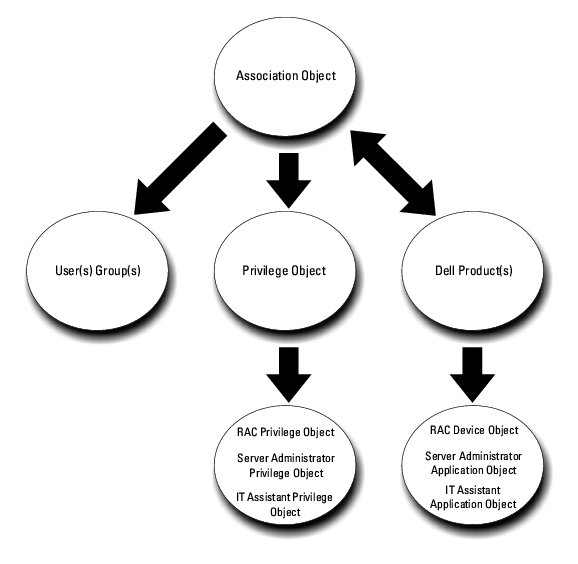
Dell created Classes, or groups of objects, that can be configured by the user to meet their unique needs. New Classes in the schema include an Association, a Product, and a Privilege class. An Association object links the users or groups to a given set of privileges and to systems (Product Objects) in your network. This model gives an administrator control over the different combinations of users, privileges, and systems or RAC devices on the network, without adding complexity.
For each of the systems that you want to integrate with Active Directory for authentication and authorization, there must be at least one Association Object and one Product Object. The Product Object represents the system. The Association Object links it with users and privileges. You can create as many Association Objects as you need.
Each Association Object can be linked to as many users, groups of users, and Product Objects as desired. The users and Product Objects can be from any domain. However, each Association Object may only link to one Privilege Object. This behavior allows an Administrator to control which users have which rights on specific systems.
The Product Object links the system to Active Directory for authentication and authorization queries. When a system is added to the network, the Administrator must configure the system and its product object with its Active Directory name so that users can perform authentication and authorization with Active Directory. The Administrator must also add the system to at least one Association Object in order for users to authenticate.
Figure 8-1 illustrates that the Association Object provides the connection that is needed for all of the authentication and authorization.
Figure 8-1. Typical Setup for Active Directory Objects
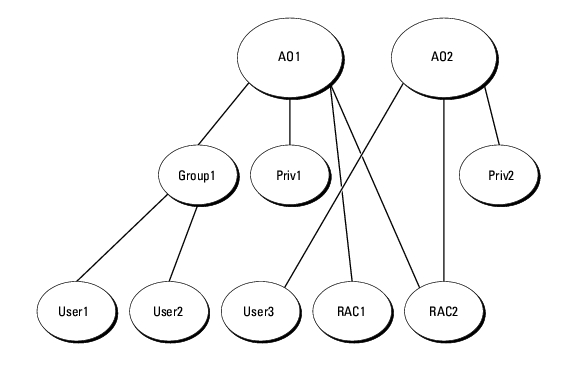
In addition, you can set up Active Directory objects in a single domain or in multiple domains. Setting up objects in a single domain does not vary, whether you are setting up RAC, Server Administrator, or IT Assistant objects. When multiple domains are involved, however, there are some differences.
For example, you have two DRAC 4 cards (RAC1 and RAC2) and three existing Active Directory users (user1, user2, and user3). You want to give user1 and user2 an Administrator privilege on both DRAC 4 cards and give user3 a Login privilege on the RAC2 card. Figure 8-2 shows how you set up the Active Directory objects in this scenario.
Figure 8-2. Setting Up Active Directory Objects in a Single Domain
To set up the objects for the single domain scenario, perform the following tasks:
See "Adding Users and Privileges to Active Directory" for detailed instructions.
Figure 8-3 shows how to setup the Active Directory objects in multiple domains for RAC. In this scenario, you have two DRAC 4 cards (RAC1 and RAC2) and three existing Active Directory users (User1, User2, and User3). User1 is in Domain1, but User2 and User3 are in Domain2. You want to give User1 and User2 Administrator privileges on both the RAC1 and the RAC2 card and give User3 a Login privilege on the RAC2 card.
Figure 8-3. Setting Up RAC Active Directory Objects in Multiple Domains

To set up the objects for this multiple domain scenario, perform the following tasks:
For Server Administrator or IT Assistant, on the other hand, the users in a single Association can be in separate domains without needing to be added to a universal group. The following is a very similar example to show how Server Administrator or IT Assistant systems in separate domains affect the setup of directory objects. Instead of RAC devices, you'll have two systems running Server Administrator (Server Administrator Products sys1 and sys2). Sys1 and sys2 are in different domains. You can use any existing Users or Groups that you have in Active Directory. Figure 8-4 shows how to set up the Server Administrator Active Directory objects for this example.
Figure 8-4. Setting Up Server Administrator Active Directory Objects in Multiple Domains
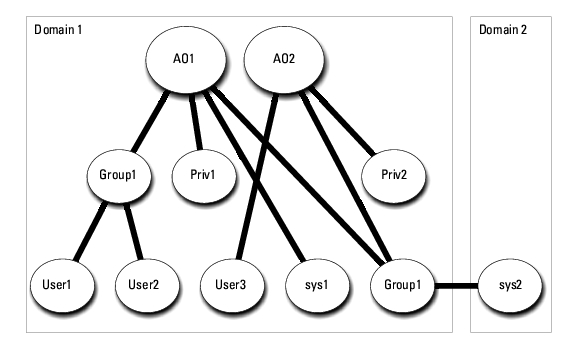
To set up the objects for this multiple domain scenario, perform the following tasks:
Note that neither of the Association objects needs to be of Universal scope in this case.
Before you can use Active Directory to access your systems, you must configure both the Active Directory software and the systems.
RAC, Server Administrator, and IT Assistant schema extensions are available. You only need to extend the schema for software or hardware that you are using. Each extension must be applied individually to receive the benefit of its software-specific settings. Extending your Active Directory schema will add schema classes and attributes, example privileges and association objects, and a Dell organizational unit to the schema.
|
|
NOTE: Before you extend the schema, you must have Schema Admin privileges on the Schema Master Flexible Single Master Operation (FSMO) Role Owner of the domain forest. |
You can extend your schema using two different methods. You can use the Dell Schema Extender utility, or you can use the Lightweight Directory Interchange Format (LDIF) script file.
|
|
NOTE: The Dell organizational unit will not be added if you use the LDIF script file. |
The LDIF script files and Dell Schema Extender are located on your Dell Systems Management Consoles CD in the following respective directories:
Installation type will be either RAC4, RAC3, Server Administrator, or IT Assistant version 7.0 or later, depending on your choice of schema extension.
To use the LDIF files, see the instructions in the readme that is in the LDIF files directory. To use the Dell Schema Extender to extend the Active Directory Schema, perform the steps in "Using the Dell Schema Extender."
You can copy and run the Schema Extender or LDIF files from any location.

|
NOTICE: The Dell Schema Extender uses the SchemaExtenderOem.ini file. To ensure that the Dell Schema Extender utility functions properly, do not modify the name or the contents of this file. |
To verify the schema extension, use the Active Directory Schema Snap-in in the Microsoft Management Console (MMC) to verify the existence of the following classes (listed in Table 8-1, Table 8-6, Table 8-7, Table 8-9, Table 8-10, Table 8-11, and Table 8-12) and attributes (listed in Table 8-13, Table 8-14, and Table 8-15). See your Microsoft documentation for more information on how to enable and use the Active Directory Schema Snap-in in the MMC.
Table 8-1. Class Definitions for Classes Added to the Active Directory Schema
|
Class Name | Assigned Object Identification Number (OID) | Class Type |
|---|---|---|
dellRacDevice | 1.2.840.113556.1.8000.1280.1.1.1.1 | Structural Class |
dellAssociationObject | 1.2.840.113556.1.8000.1280.1.1.1.2 | Structural Class |
dellRAC4Privileges | 1.2.840.113556.1.8000.1280.1.1.1.3 | Auxiliary Class |
dellPrivileges | 1.2.840.113556.1.8000.1280.1.1.1.4 | Structural Class |
dellProduct | 1.2.840.113556.1.8000.1280.1.1.1.5 | Structural Class |
dellRAC3Privileges | 1.2.840.113556.1.8000.1280.1.1.1.6 | Auxiliary Class |
dellOmsa2AuxClass | 1.2.840.113556.1.8000.1280.1.2.1.1 | Auxiliary Class |
dellOmsaApplication | 1.2.840.113556.1.8000.1280.1.2.1.2 | Structural Class |
dellIta7AuxClass | 1.2.840.113556.1.8000.1280.1.3.1.1 | Auxiliary Class |
dellItaApplication | 1.2.840.113556.1.8000.1280.1.3.1.2 | Structural Class |
Table 8-2. dellRacDevice Class
|
OID | 1.2.840.113556.1.8000.1280.1.1.1.1 |
|---|---|
|
Description | This class represents the Dell RAC device. The RAC Device must be configured as dellRacDevice in Active Directory. This configuration enables the DRAC 4 to send LDAP queries to Active Directory. |
|
Class Type | Structural Class |
|
SuperClasses | dellProduct |
|
Attributes | dellSchemaVersion dellRacType |
Table 8-3. dellAssociationObject Class
|
OID | 1.2.840.113556.1.8000.1280.1.1.1.2 |
|---|---|
|
Description | This class represents the Dell Association Object. The Association Object provides the connection between the users and the devices or products. |
|
Class Type | Structural Class |
|
SuperClasses | Group |
|
Attributes | dellProductMembers dellPrivilegeMember |
Table 8-4. dellRAC4Privileges Class
|
OID | 1.2.840.113556.1.8000.1280.1.1.1.3 |
|---|---|
|
Description | This class is used to define the privileges (Authorization Rights) for the DRAC 4 device. |
|
Class Type | Auxiliary Class |
|
SuperClasses | None |
|
Attributes | dellIsLoginUser dellIsCardConfigAdmin dellIsUserConfigAdmin dellIsLogClearAdmin dellIsServerResetUser dellIsConsoleRedirectUser dellIsVirtualMediaUser dellIsTestAlertUser dellIsDebugCommandAdmin |
Table 8-5. dellPrivileges Class
|
OID | 1.2.840.113556.1.8000.1280.1.1.1.4 |
|---|---|
|
Description | This class is used as a container Class for the Dell Privileges (Authorization Rights). |
|
Class Type | Structural Class |
|
SuperClasses | User |
|
Attributes | dellRAC4Privileges dellRAC3Privileges dellOmsaAuxClass dellItaAuxClass |
|
OID | 1.2.840.113556.1.8000.1280.1.1.1.5 |
|---|---|
|
Description | This is the main class from which all Dell products are derived. |
|
Class Type | Structural Class |
|
SuperClasses | Computer |
|
Attributes | dellAssociationMembers |
Table 8-7. dellRAC3Privileges Class
|
OID | 1.2.840.113556.1.8000.1280.1.1.1.6 |
|---|---|
|
Description | This class is used to define the privileges (Authorization Rights) for the DRAC III, DRAC III/XT, ERA, ERA/O, and ERA/MC devices. |
|
Class Type | Auxiliary Class |
|
SuperClasses | None |
|
Attributes | dellIsLoginUser |
Table 8-8. dellOmsa2AuxClass Class
|
OID | 1.2.840.113556.1.8000.1280.1.2.1.1 |
|---|---|
|
Description | This class is used to define the privileges (Authorization Rights) for Server Administrator. |
|
Class Type | Auxiliary Class |
|
SuperClasses | None |
|
Attributes | dellOmsaIsReadOnlyUser dellOmsaIsReadWriteUser dellOmsaIsAdminUser |
Table 8-9. dellOmsaApplication Class
|
OID | 1.2.840.113556.1.8000.1280.1.2.1.2 |
|---|---|
|
Description | This class represents the Server Administrator application. Server Administrator must be configured as dellOmsaApplication in Active Directory. This configuration enables the Server Administrator application to send LDAP queries to Active Directory. |
|
Class Type | Structural Class |
|
SuperClasses | dellProduct |
|
Attributes | dellAssociationMembers |
Table 8-10. dellIta7AuxClass Class
|
OID | 1.2.840.113556.1.8000.1280.1.3.1.1 |
|---|---|
|
Description | This class is used to define the privileges (Authorization Rights) for IT Assistant. |
|
Class Type | Auxiliary Class |
|
SuperClasses | None |
|
Attributes | dellItaIsReadOnlyUser dellItaIsReadWriteUser dellItaIsAdminUser |
Table 8-11. dellItaApplication Class
|
OID | 1.2.840.113556.1.8000.1280.1.3.1.2 |
|---|---|
|
Description | This class represents the IT Assistant application. IT Assistant must be configured as dellItaApplication in Active Directory. This configuration enables IT Assistant to send LDAP queries to Active Directory. |
|
Class Type | Structural Class |
|
SuperClasses | dellProduct |
|
Attributes | dellAssociationMembers |
Table 8-12. General Attributes Added to the Active Directory Schema
Table 8-13. RAC-specific Attributes Added to the Active Directory Schema
Table 8-14. Server Administrator-Specific Attributes Added to the Active Directory Schema
Table 8-15. IT Assistant-Specific Attributes Added to the Active Directory Schema
When you extend the schema in Active Directory, you must also extend the Active Directory Users and Computers snap-in so that the administrator can manage Products, Users and User Groups, Associations, and Privileges. You only need to extend the snap-in once, even if you have added more than one schema extension. You must install the snap-in on each system that you intend to use for managing these objects. The Dell Extension to the Active Directory Users and Computers Snap-In is an option that can be installed when you install your systems management software using the Dell Systems Management Consoles CD.
|
|
NOTE: You must install the Administrator Pack on each management station that is managing the new Active Directory objects. The installation is described in the following section, "Opening the Active Directory Users and Computers Snap-In." If you do not install the Administrator Pack, then you cannot view the new object in the container. |
|
|
NOTE: For more information about the Active Directory Users and Computers snap-in, see your Microsoft documentation. |
To open the Active Directory Users and Computers snap-in, perform the following steps:
The Microsoft Management Console (MMC) window opens.
The Dell-extended Active Directory Users and Computers snap-in allows you to add DRAC, Server Administrator, and IT Assistant users and privileges by creating RAC, Association, and Privilege objects. To add an object, perform the steps in the applicable subsection.
|
|
NOTE: Server Administrator and IT Assistant users must use Universal-type Product Groups to span domains with their product objects. |
|
|
NOTE: When adding Universal-type Product Groups from separate domains, you have to create an Association object with Universal scope. The default Association objects created by the Dell Schema Extender utility are domain Local Groups and will not work with Universal-type Product Groups from other domains. |
In the Console Root (MMC) window, right-click a container.
The New Object window opens.
Privilege Objects must be created in the same domain as the Association Object to which they are associated.
The New Object window opens.
The Association Object is derived from a Group and must contain a group Type. The Association Scope specifies the Security Group Type for the Association Object. When you create an Association Object, you must choose the Association Scope that applies to the type of objects you intend to add. Selecting Universal, for example, means that Association Objects are only available when the Active Directory Domain is functioning in Native Mode or above.
The New Object window opens.
By using the Association Object Properties window, you can associate users or user groups, privilege objects, systems, RAC devices, and system or device groups.
|
|
NOTE: RAC users must use Universal Groups to span domains with their users or RAC objects. |
You can add groups of Users and Products. You can create Dell-related groups in the same way that you created other groups.
To add Users or User Groups:
Click the Privilege Object tab to add the privilege object to the association that defines the user's or user group's privileges when authenticating to a system.
|
|
NOTE: You can add only one Privilege Object to an association object. |
To add a privilege:
Click the Products tab to add one or more systems or devices to the association. The associated objects specify the products connected to the network that are available for the defined users or user groups.
|
|
NOTE: You can add multiple systems or RAC devices to an Association Object. |
To add Products:
If you plan to use Microsoft Enterprise Root CA to automatically assign all your domain controllers SSL certificates, you must perform the following steps to enable SSL on each domain controller.
|
|
NOTE: The following steps may vary slightly if you are using Windows 2000. |
|
|
NOTE: If the DRAC 4 firmware SSL certificate is signed by a well-known CA, you do not need to perform the steps described in this section. |
|
|
NOTE: The following steps may vary slightly if you are using Windows 2000. |
If you have installed your own certificate, ensure that the CA signing your certificate is in the Trusted Root Certification Authority list. If the CA is not in the list, you must install it on all your Domain Controllers.
|
|
NOTE: If the DRAC 5 firmware SSL certificate is signed by a well-known CA, you do not need to perform the steps described in this section. |
|
|
NOTE: The following steps may vary slightly if you are using Windows 2000. |
The DRAC 5 SSL certificate is the same certificate that is used for the DRAC 4 Web server. All DRAC 4 controllers are shipped with a default self-signed certificate.
If you have installed your own certificate, ensure that the CA signing your certificate is in the Trusted Root Certification Authority list. If the CA is not in the list, you must install it on all your Domain Controllers.
For instructions on how to configure your Server Administrator or IT Assistant systems using CLI commands, see "Configuring Active Directory Using CLI on Systems Running Server Administrator" and "Configuring Active Directory on Systems Running IT Assistant." For DRAC users, there are two ways to configure DRAC 4. See either "Configuring the DRAC 4 Using the Web-Based Interface" or "Configuring DRAC 4 and DRAC 5 Active Directory Settings Using the racadm CLI."
|
|
NOTE: The systems on which Server Administrator and/or IT Assistant are installed must be a part of the Active Directory domain and should also have computer accounts on the domain. |
You can use the omconfig preferences dirservice command to configure the Active Directory service. The productoem.ini file is modified to reflect these changes. If the adproductname is not present in the productoem.ini file, a default name will be assigned. The default value will be system name-software-product name, where system name is the name of the system running Server Administrator, and software-product name refers to the name of the software product defined in omprv32.ini (that is, computerName-omsa).
|
|
NOTE: This command is applicable only on systems running the Windows operating system. |
|
|
NOTE: Restart the Server Administrator service after you have configured Active Directory. |
Table 8-16 shows the valid parameters for the command.
Table 8-16. Active Directory Service Configuration Parameters
By default, the Active Directory product name corresponds to the machinename-ita, where machinename is the name of the system on which IT Assistant is installed. To configure a different name, locate the itaoem.ini file in your installation directory. Edit the file to add the line "adproductname=text" where text is the name of the product object that you created in Active Directory. For example, the itaoem.ini file will contain the following syntax if the Active Directory product name is configured to mgmtStationITA.
productname=IT Assistant
startmenu=Dell OpenManage Applications
autdbid=ita
accessmask=3
startlink=ITAUIServlet
adsupport=true
adproductname=mgmtStationITA
|
|
NOTE: Restart the IT Assistant services after saving the itaoem.ini file to the disk. |
|
|
NOTE: The File Path value displays the relative file path of the certificate you are uploading. You must type the absolute file path, which includes the full path and the complete file name and file extension. |
Your domain forest domain controllers' SSL certificates need to have signed this root CA certificate. Have the root CA certificate available on your local system. See Exporting the Domain Controller Root CA Certificate (RAC Only).
The DRAC 5 Web server automatically restarts after you click Apply.
The Network Configuration page appears.
To manually input a DNS server IP address, deselect Use DHCP to obtain DNS server addresses and type your primary and alternate DNS Server IP addresses.
This completes the DRAC 5 Active Directory feature configuration.
Using the following commands to configure the DRAC 4 Active Directory feature using the racadm CLI instead of the Web-based interface.
racadm config -g cfgActiveDirectory -o cfgADEnable 1
racadm config -g cfgActiveDirectory -o cfgADRacDomain <fully qualified rac domain name>
racadm config -g cfgActiveDirectory -o cfgADRootDomain <fully qualified root domain name>
racadm config -g cfgActiveDirectory -o cfgADRacName <RAC common name>
racadm sslcertupload -t 0x2 -f <ADS root CA certificate>
racadm sslcertdownload -t 0x1 -f <RAC SSL certificate>
racadm config -g cfgLanNetworking -o cfgDNSServersFromDHCP 1
racadm config -g cfgLanNetworking -o cfgDNSServersFromDHCP 0
racadm config -g cfgLanNetworking -o cfgDNSServer1 <primary DNS IP address>
racadm config -g cfgLanNetworking -o cfgDNSServer2 <secondary DNS IP address>
See the Dell Remote Access Controller 4 User's Guide or Dell Remote Access Controller 5 User's Guide for more information.
You can use Active Directory to log in to the DRAC 5 using one of the following methods:
The login syntax is consistent for all three methods:
<username@domain> (or) <domain>\<username> (or) <domain>/<username>
where username is an ASCII string of 1–256 bytes.
White space and special characters (such as \, /, or @) cannot be used in the user name or the domain name.